1.20.2012

Exploring free form

I'll admit it.  I used to be soley a pattern / template girl.  It used to be really, really hard for me to stray off the documented path to create something without guidance.  I've gotten a bit better but this year I will be working hard to break away from patterns / templates / guides and be a lot more improvisation and free form in my creative endeavors.  That is one of the reasons I jumped at the chance to join this round robin quilt group.  It is all about free form and using what you have in your stash (another goal of mine for 2012-minimize the stuff).

This is my starter block.  Simple, clean and (intentionally) not quite square (measures ~14" x 15").  The block has arrived safely at Laney's.  Part of me doesn't want to see any 'in progress' photos and just wants to see the final when it arrives back home.  The other, more controlling-cannot-wait-to-find-out part of me wants to stalk flickr awaiting updates as the quilt makes its rounds.


Meanwhile, Lynz has sent her block off already and I'll be the 1st one to add to it.  You should see it-amazing started block.  Off to do some creative thinking.


Total AFFB quilt to date:  $2.65 or so in postage.  That's it!  Fabric, thread, journal, jewels and shipping envelope were all items I had on hand.  Score and score!

1.18.2012

I am nothing if not

consistently inconsistent when it comes to posting on this blog.  I find that, while my intentions are good, I don't always enjoy the prospect of weeding through photos, cropping, uploading, etc and that lends itself to be an easy excuse not to blog more regularly.  A friend of mine has recently started blogging and she's motivated me to try to be a bit more consistent and thoughtful in my blogging.  How long will it last?  Time will tell.


Happy (belated) New Year!!!  I don't really do resolutions because I figure why wait for the new year to start.  This year a few pals and I started an enabler's club.  Positive enabling.  If we meet our goal(s) for the month then our name goes in to the kitty to get a small value gift card funded by the other participants.  I am doing well so far and am on track for January.  Whenever I feel like wavering, I think of the gift card and how I could use that to buy supplies for lil bit's scrapbook (who knew scrap booking could be so expensive?).  Thanks to a dear friend, I have a number of scrap book pages that I just need to add the photos to and do a bit of journaling.  I'm still about 14 months behind (keep in mind lil bit is only 2) but I am gaining ground.


12.26.2011

Just under the wire...

I found an idea about 3 months ago.  A snowman ornament using fingerprints.  What a great (and easy) idea.  Surely that can't take too long to put together.  I must have all the supplies already, right?  Well, I had most of the supplies and came by the background piece at ACMoore pretty easily (if you discount the 20 minutes I spent traversing the store looking for a canvas substitute).  Time, on the other hand (no pun intended), was a supply that I had run short on. 

So, just under the wire, this ornament made it on to our Christmas tree last evening.  I followed this tutorial except that I used Aleene's Tacky Glue to glue the ribbon to the back and then I covered the entire front and back with Mod Podge.  Oh, and I put a piece of scrapbook paper on the back to make it pretty and provide a nice surface to write the details (not pictured, sorry).
Not the greatest photo but the colors are actually pretty true to life.

Total cost:  $0.87 for the small wood piece used for the background.  
All the other supplies I had on hand (acrylic craft paint, sharpies, brushes, Mod Podge, glue, scrapbook paper and ribbon).

And while what I have pictured is a tree ornament, I have plans to make the same (w/o the background color) on some colored cardstock to make postcards to mail out this winter.

12.05.2011

Decking the halls

As each year passes I seem to be coming later and later to the holiday game.  My shopping is done but I just keep dragging my feet when it comes to decorating.  Once it's done, I love it and wonder why I was hemming and hawing so much.


For the last few years I've said that I wanted I decorated the side porch. At the end of each Christmas season I kick myself for not doing it.  This year I finally did it.  Not the tree I was originally thinking but I like this all the same.  I may need to add a bit more to it....let's see how much energy I have (and funds and supplies) once the inside is finished.
Before


After
TOTAL COST:
Wreath:  Totally from materials I had on hand - all were gifts.  Well, except for the 3 flowers which were left over from the porch garland.
Porch Garland, lights and flowers:  All from ACMoore and cost ~$30.00
Happy Holidays!

12.01.2011

Tag, you're it

Because I need another hobby like I need a hole in my head.... Monday evening I went with a gal pal of mine to a scrapbooking workshop where we made holiday gift tags and cards.  I like the satisfaction of sitting down and being able to leave with a finished product.  Sewing, while something I enjoy doing, usually takes me a few times at the machine to complete a project.  And, since my sewing room is away from the main living space, it can (although not always a bad thing) leave me feeling a bit isolated.

Here's what I came home with:  (4) cards and (6 actually there are 8 but I forgot to take the picture) tags (there are (3 4) different kinds of tags).  Now I am going to have to rethink my gift wrapping...maybe this year it will be brown craft paper.


I think the blue one is my favorite.  Simple, clean and kinda modern.

And, did I mention that I'm working on a scrapbook for baby pictures?  I started off saying, "Nothing fancy, just a place to record and document what's going on."  Well, thanks to another great gal pal of mine who is in to paper crafts but not scrapbooking, I've been getting some really cool pages.  Now all I need to do is get some photos printed and do some journaling.  Only 15 months left and I'll be up to date.  Geesh!

Linked here:  Between U and Me; Love Sweet Love; A Glimpse Inside


11.24.2011

Happy Thanksgiving!

Happy Thanksgiving everyone.  I hope this holiday finds you safe, healthy and surrounded by those you love, or at least like.
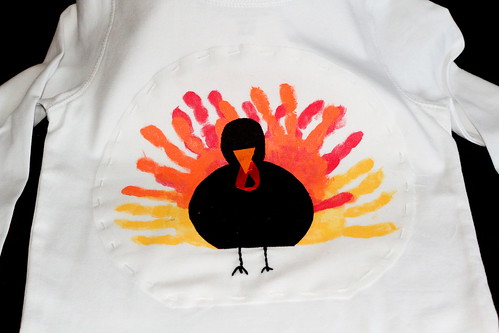
Want to make a turkey shirt for your toddler or yourself?  Yea, ok, file it away for next year.  Or maybe you have a late Thanksgiving event this weekend.


Partial cast of characters:
1.  Sketch out the body shape with a disappearing ink pen (fabric stores have them), pencil, dress makers chalk, etc.  Or, trace your toddler's foot (with a shoe on).
2.  Paint up both hands and stamp on the fabric (I used 100% cotton) overlapping the body lines a bit.  Fill in areas with a paintbrush.  Let dry.
3.  Repeat with other colors.  Set paint per manufacturer directions.
4.  Iron fusible web to the back of a brown piece of fabric.  Cut a turkey body shape and fuse on to the background fabric.  You could sew this on.
5.  Iron fusible web to an orange piece of fabric.  Cut into a triangle shape (this is the beak).
6.  Take a piece of red ribbon and make a loop.  Secure end with fabric glue.  Let dry.
7.  Lay the ribbon in place with the orange beak on top.  Fuse to the body fabric.
8.  Stitch legs and feet with embroidery thread.  Or, sew on a sewing machine, use ribbon, rickrack, whatever you've got on hand.


I made the turkey on a piece of Kona 100% cotton.  Since this is a 1-holiday wear, I wanted to be able to save it.  Attaching it to the shirt with a quick basting stitch allows me to take it off and put it in her scrapbook.

The hair flower clip is a la a tutorial from A Girl and a Glue Gun. Gobble gobble.


Linked here: 5 Days...5 Ways, The Train to Crazy, Between U and Me, Fireflies and Jellybeans and Somewhat Simple

11.22.2011

Checking the Asterisk Quilt off the list

A late summer finish (never mind that it was started 14 months ago) adding a bit of cheer to late fall grey skies.  The asterisk quilt is finally done!!!
The blocks in this quilt were made by the Bee Obsessed virtual quilt group over on Flicker.  I had planned to make it twin size but, well, I just got tired of making more blocks. Now it's a great picnic size quilt for a little girl and her friends. I picked the theme and all the fabric came from stashes. I loved examining each and every block when they arrived - sew much fun to see how others put fabrics together, find common patterns, etc.

 
That brings my WIP quilt list down to:
1.  Red and white flimsy a la Denyse Schmidt for my nephew (it's been waiting for almost 2 years).
2.  Assembling my husband's brown and orange quilt (his color request).
3.  Black, white and green string quilt for another virtual bee.  I'm actually working on quilting this one now.
4.  Assembling the rainbow block quilt (from another flickr bee).